Your home is one of your most valuable investments, so keeping it clean is essential for your health, comfort, and property value. With so many house cleaning companies online, choosing the right service can feel overwhelming.
The good news is that with the right approach, you can compare house cleaning services online and confidently select the one that fits your lifestyle and budget.

What to Know Before You Start Searching
Before you jump into house cleaning company reviews, take time to clarify your needs.
Do you need recurring weekly cleaning, a deep clean before hosting guests, or eco-friendly cleaning services?
Knowing exactly what you’re looking for helps you filter options quickly and compare only the most relevant companies.

The Best Way to Compare House Cleaning Companies Online
Check Company Websites First
A professional website often reveals how trustworthy a company is. Look for details on their service packages, transparent pricing, proof of insurance, and licensing.
Companies that clearly outline their cleaning process, cancellation policies, and guarantees usually operate with professionalism and accountability.
Read Customer Reviews and Testimonials
Reading house cleaning company reviews on Google, Yelp, and Facebook is one of the most reliable ways to evaluate quality.
Pay attention to recurring themes in customer feedback, such as punctuality, friendliness, or consistency.
One or two negative reviews may not be a red flag, but repeated complaints about the same issue often indicate deeper problems.
Compare Service Packages Side by Side
Not all cleaning businesses offer the same services. Some focus on move-out cleaning or deep cleans, while others specialize in ongoing weekly or biweekly maintenance.
When you compare house cleaning services online, check what’s included in each package. Also confirm whether the company provides cleaning supplies or if you’ll need to supply your own.

Evaluate Pricing and Value
When comparing cleaning prices online, don’t just look for the cheapest option.
A slightly higher rate might include eco-friendly cleaning products, highly trained staff, and excellent customer service.
Always read the fine print to ensure there are no hidden fees. The goal is to balance affordability with quality.
Assess Communication and Responsiveness
Strong communication is key when hiring a cleaning company. When you contact them by phone, email, or live chat, notice how quickly and professionally they respond.
A business that provides clear answers and flexible scheduling demonstrates reliability, something you’ll appreciate in the long run.
Confirm Insurance and Employee Background Checks
Inviting cleaners into your home requires trust. Always verify that the company carries liability insurance and conducts background checks on employees.
Choosing licensed and insured cleaning companies not only protects your property but also provides peace of mind.
Look for Flexibility and Customization
Life is busy, and the best cleaning companies adapt to your schedule. Look for services that offer custom cleaning plans, flexible bookings, and easy rescheduling.
A company willing to tailor its services to your lifestyle shows that it values customer satisfaction.
Check for Eco-Friendly Practices
If sustainability matters to you, prioritize companies that use green cleaning products and eco-conscious practices.
Many homeowners prefer eco-friendly cleaning services to reduce exposure to harsh chemicals while protecting the environment.

Conclusion
Learning how to compare house cleaning companies online doesn’t have to be overwhelming.
By checking company websites, reading reviews, comparing packages, and confirming insurance, you can confidently choose the right fit for your home. The best approach combines online research with a focus on value, trustworthiness, and customer care.
NW Maids is a trusted house cleaning service that homeowners recommend for its reliability, flexible scheduling, and professional cleaning standards.
If you’re ready to find a cleaning team you can count on, book your next cleaning with NW Maids today.
Related Posts:
- Cleaning Routine Ideas for Busy Couples
- Basement Cleaning Guide: Safety, Organization, and Maintenance
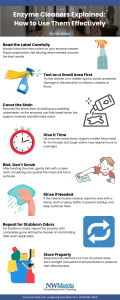
- Enzyme Cleaners Explained: How to Use Them Effectively
- How to Declutter and Clean a Garage in One Weekend