Homes in rainy regions face unique cleaning challenges—constant dampness, mud-tracked floors, and lingering moisture that can lead to mold growth and unpleasant odors.
Following a seasonal cleaning routine is essential for homeowners in wet climates.
The right approach to rainy season home maintenance helps prevent water damage, improve air quality, and keep your space clean, dry, and healthy throughout the year.
Why Seasonal Cleaning Matters in Rainy Climates
If you live in an area with frequent rainfall or high humidity, your home is more vulnerable to mold, mildew, and musty smells.
Dirt and mud tracked indoors can quickly damage flooring and carpets, while constant dampness can harm paint, wood, and upholstery.
Regular seasonal cleaning in rainy climates goes beyond appearances—it protects your home’s structure, reduces allergens, and keeps your indoor environment healthy and comfortable.

How to Maintain a Fresh Home During the Rainy Season
1. Inspect and Clean Gutters and Downspouts
One of the most important rainy weather home maintenance tips is to clean your gutters regularly.
Clogged gutters can cause rainwater to overflow, damaging your home’s walls, foundation, and landscaping.
Inspect your gutters and downspouts during the wet season, removing debris, leaves, and moss. Make sure water flows at least five feet away from your foundation.
Consistent gutter cleaning prevents leaks, water damage, and exterior mold growth.
2. Control Dampness in Basements and Crawl Spaces
Basements and crawl spaces often retain excess moisture during rainy months.
Check for signs of leaks, condensation, or mold. Use a dehumidifier and install vapor barriers if needed.
Keeping these areas dry helps prevent structural problems, wood rot, and musty odors that spread throughout the home.
3. Protect Wooden Surfaces from Moisture
Wood floors, furniture, and doors absorb moisture easily in humid weather. Wipe surfaces with a damp cloth followed by a dry one to remove lingering moisture.
Applying a wood sealant or protective finish provides extra resistance to humidity. Routine care for wooden surfaces helps them withstand the effects of a rainy climate.
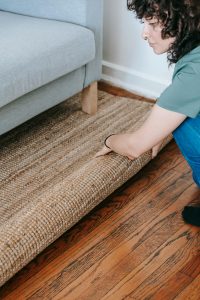
4. Deep Clean Carpets and Rugs
Mud and water stains are inevitable in wet weather. Vacuum carpets frequently to remove surface dirt and schedule deep carpet cleaning at least once a year.
For stubborn stains, use cleaners designed for your carpet type. Rotating area rugs can also help them dry evenly and reduce the risk of mold and mildew.
5. Improve Ventilation in Humid Homes
Good ventilation is crucial for preventing mold and moisture buildup. Open windows on dry days and use exhaust fans in kitchens and bathrooms.
In persistently humid homes, consider installing a whole-house ventilation system to regulate airflow and keep your indoor air fresh and dry.

6. Remove Mold and Mildew Immediately
Rainy climates create perfect conditions for mold. Inspect bathrooms, kitchens, basements, and window frames regularly.
Clean small patches using natural mold removers like white vinegar or baking soda.
For larger infestations, contact a professional mold remediation service to ensure complete removal and prevent recurrence.
7. Wash Windows and Window Treatments
Rain often leaves streaks, dust, and residue on glass surfaces.
Regular window cleaning brightens your home and improves visibility. Wash curtains, blinds, and shades as they can absorb moisture and trap dust.
Keeping these areas clean helps your home feel fresh even during continuous rainy days.
8. Refresh Upholstery and Soft Furnishings
Upholstered furniture tends to trap moisture and odors. Vacuum fabric surfaces weekly and use steam cleaning to remove deep dirt.
For leather furniture, apply conditioner to prevent cracking and mildew.
Clean, dry furnishings will make your home smell fresher and reduce allergy triggers.
9. Maintain Clean and Dry Entryways
Your entryway is the first defense against outdoor mud and moisture. Place absorbent doormats both outside and inside entrances.
Wipe down door frames, mop floors, and clean wet shoes or umbrellas regularly. Keeping this area tidy prevents dirt from spreading to other rooms.
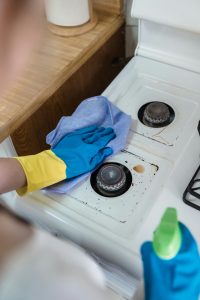
10. Service Appliances Affected by Humidity
High humidity can affect appliances like washers, dryers, and dehumidifiers. Inspect hoses, vents, and filters for mold or blockages.
Schedule seasonal appliance maintenance to ensure efficiency and prevent hidden moisture buildup.
This extends the lifespan of your appliances and helps you save on costly repairs.
11. Declutter and Use Moisture-Resistant Storage
Excess clutter can trap moisture and attract mold. Sort through storage areas and discard items that hold water or develop odors.
Use airtight, moisture-resistant containers to store seasonal items. Keep boxes elevated from floors to prevent damage during floods or leaks.
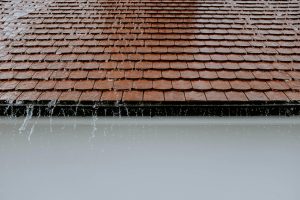
12. Inspect Roofs and Exterior Walls
A wet climate can quickly expose weak spots in your home’s structure. Inspect your roof for missing shingles, cracks, or damaged flashing.
Check siding for leaks or peeling paint. Prompt roof maintenance and wall repairs prevent leaks, wood rot, and structural deterioration.
13. Plan a Seasonal Cleaning Schedule
Set up a cleaning schedule aligned with seasonal changes. In rainy climates, prioritize tasks like gutter maintenance, carpet deep cleaning, and mold inspections.
Breaking cleaning tasks into manageable routines helps you stay consistent and maintain a healthy home year-round.

Stay Ahead of the Rain
Living in a rainy climate doesn’t mean living with dampness or mold.
With these seasonal cleaning tips for homes in rainy climates, you can protect your property, enhance indoor air quality, and create a cleaner, more comfortable space.
From regular ventilation to thorough deep cleaning, a proactive approach keeps your home safe and dry no matter how wet the weather gets.
Need help maintaining your home during the rainy season?
Let NW Maids House Cleaning Service take care of the details. Our experienced cleaners offer seasonal cleaning services designed for homes in wet and humid environments.
Visit NWMaids.com to schedule your next professional cleaning and keep your home fresh, clean, and ready for any season.
Related Posts:
- How to Clean Up Pine Needles After Christmas
- Stop Winter Mold Before It Starts: Home Protection Guide
- Winter Home Prep Guide: Make Your Home Holiday-Ready
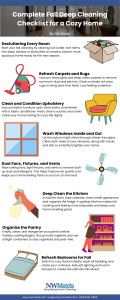
- Complete Fall Deep Cleaning Checklist for a Cozy Home